Setting up a controller
After setting up WiLake, the next step is to set up a connection to an UniFi Controller.
Requirements
Section titled “Requirements”For this guide, you’ll need to have the following things set up:
- Physical wifi infrastructure (AP)
- A UniFi Controller
- A site registered within the controller
- Superadmin permissions in the controller WebApp
- Grant firewall access to the controller’s WebApp to WiLake’s IP address
Creating the controller
Section titled “Creating the controller”Once these requirements are satisfied, proceed to Networking → Controllers in the sidebar, and press the button to create a new controller. Provide a name for the controller and its public-facing base URL. This URL must be either a domain name or an IP address (v4 and v6 are supported) using the HTTP or HTTPS protocol (with a valid TLS certificate signed by a trusted CA). Finally, click save.
A credential pair (username and password) will be shown on screen. These credentials will only be shown once. We’ll use these credentials to allow WiLake access to the controller.
Configurando la controladora
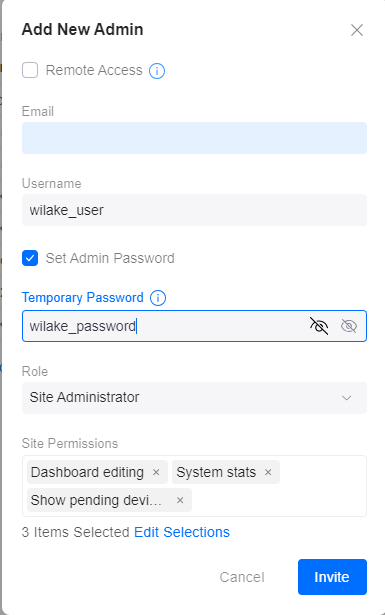
Section titled “Configurando la controladora”In the controller, go to Settings → System → Admins, press the “Add new admin” button and fill it in as follows:
- Remote access: Unchecked
- Email: Empty
- Username: Provided by WiLake (e.g. wilake_1234)
- Temporary password: Provided by WiLake (e.g. abcdef12345678)
- Role: Site administrator
- Site permissions:
- Dashboard editing
- System statistics
- Show pending devices

Click on “Save” and wait a few seconds.
After the user is created in the controller, a connection test should be run to check everything is working as intended. Press the “Test connection” button in the controller and wait a few seconds. An alert will be shown if the connection is successful or if there was an error connecting (check the troubleshooting section below).
Troubleshooting
Section titled “Troubleshooting”Credential problems
Section titled “Credential problems”Ensure both the username and the password were copied correctly to the controller, with no extra spaces or characters. If unsure, regenerate the credentials (shield icon) and set the new ones up. You can also try to sign in with those credentials in the browser, and check if it works there.
Connection problems
Section titled “Connection problems”If WiLake reports a problem connecting to your controller, it may be because the service isn’t exposed to the internet, or it is blocking WiLake’s servers from connecting.
- Ensure the URL provided is correct
- Ensure the server is working and accessible over the provided URL
- Check connectivity from a different device, preferably in a different network
- Check the firewall and ensure it allows WiLake’s exit IP address to access the web service
If following the previous steps didn’t fix the problem, please contact us, and we’ll help you fix it as soon as possible.